 Lee Borlace
Streamlining Environment Provisioning for Startups with GitHub Actions Matrix Jobs
Many startups today face a struggle to find a working solution to provide white-labelled solutions for their customers. One common issue is managing...

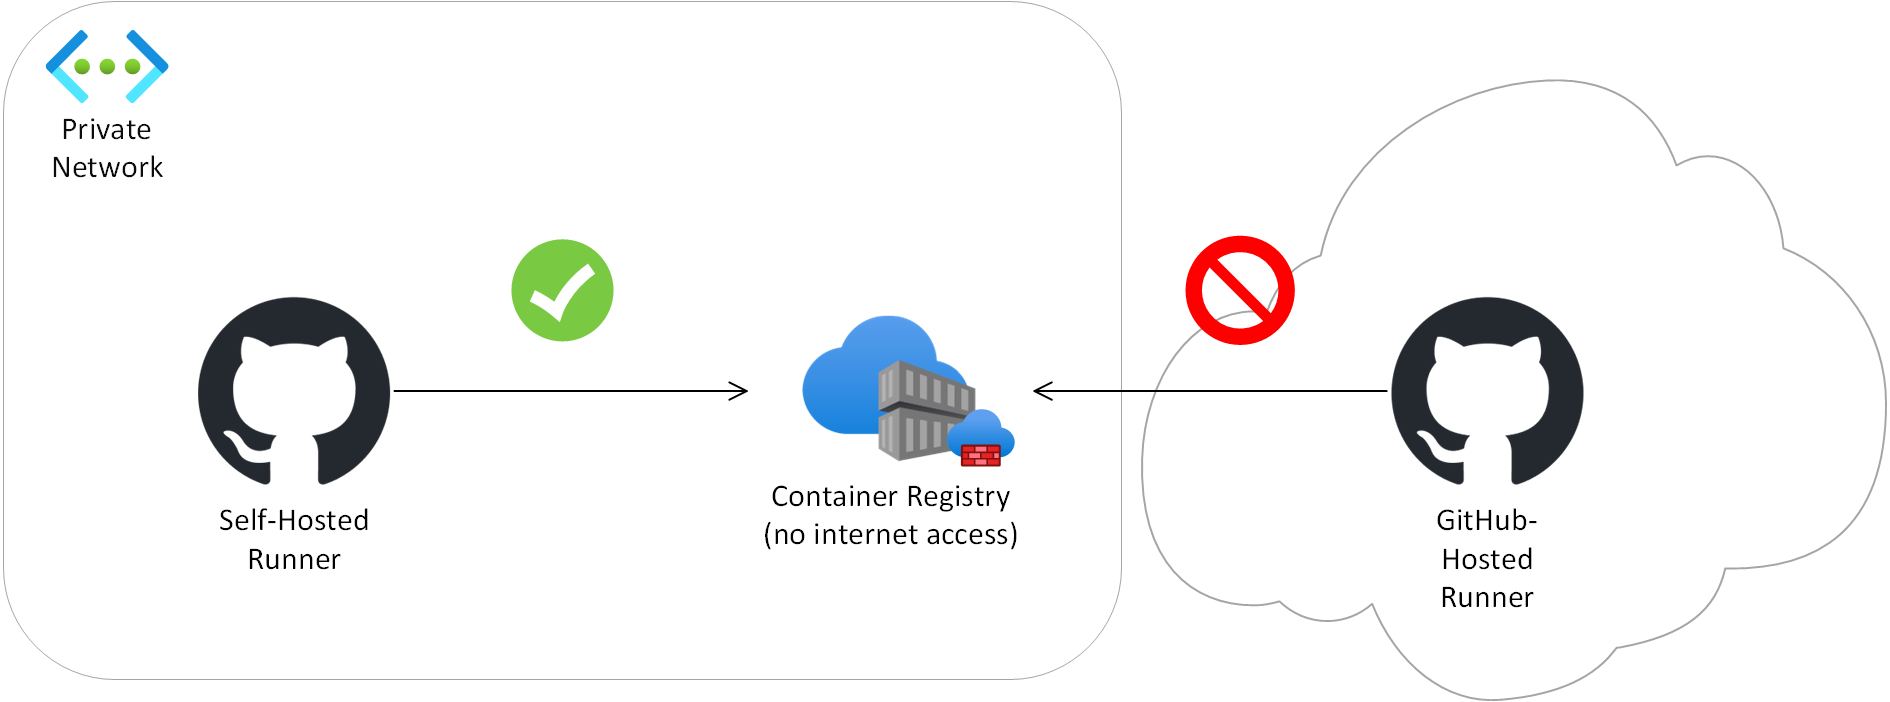
At Arkahna we build solutions for customers with tight security requirements such as government organisations. Often this means that resources like container registries and storage are not allowed to be exposed to the internet and must only be reachable via private networking. We use GitHub for CI/CD, but the default runners (i.e. the compute that actually does the work) that GitHub runs in the cloud are not able to deploy to these environments due to the network boundary. An example is the runner not being able to deploy a Docker image to a privately networked Azure Container Registry.
This is where GitHub Self-Hosted Runners come in. These are runners you host yourself within the private network. They could be in the cloud or on-premises - as long as they are on the same virtual / physical network as the resources to deploy to. They reach out to GitHub (no inbound firewall exceptions needed!) and process your CI/CD jobs. To set one of these up you install the core GitHub Runner service on a virtual or physical machine, then install whatever software your particular pipelines need.
The process has a few gotchas and this article aims to help you avoid getting gotched by some of them. It describes an Ubuntu-based install and uses a privately networked Azure solution as an example but should be largely relevant for other Linux versions and target solution platforms.
For more information on GitHub Self-Hosted Runners, see About self-hosted runners - GitHub Docs.
As a possible future alternative to self-hosted runners for Azure solutions, GitHub has a beta offering which allows private Azure networking with GitHub-hosted runners. For more information see About networking for hosted compute products - GitHub Enterprise Cloud Docs.
This builds on About self-hosted runners - GitHub Docs which should be considered the base prerequisites.
Operating System
Linux is needed if the runner will need to build Docker images. If the organisation will only have one runner consider using Linux even if there is not an immediate need for Docker in case you need Docker in the future. Ubuntu was chosen in this instance as it is relatively easy to administer.
The user performing install must be able to run sudo commands on the runner machine.
The user performing install must be able to create a local user for the service to run as, and to assign it to groups. This should be covered by sudo access.
GitHub
The user performing install needs to be an organisation owner while installing if the runner must be an organisation-level one instead of a repo-level one. An organisation-level runner can be used by all repos in the org which have common requirements.
GitHub Actions jobs which run on the self-hosted pipeline must have the following added to force them to run on the self-hosted runner: runs-on: self-hosted
GitHub Actions jobs which run on the self-hosted pipeline must have the following added.
permissions:
      contents: 'read'
      actions: 'read'
Networking
The user performing the install must be able to get a console, e.g. via SSH.
The runner machine must be able to connect to the private linked Azure resources it is required to deploy to. This must be configured at several levels:
Firewall - traffic is allowed through.
DNS - traffic must resolve to the private not public IPs.
Proxy - traffic is allowed through.
Required internet traffic:
While configuring the runner:
It is worth weighing from a security perspective whether to allow all internet traffic for the interactively logged in user when setting up the runner as a number of different hosts must be hit. It can be painstaking to open these ad-hoc in the firewall, DNS and proxy.
While running the self-hosted runner as a service:
It is suggested not to allow open internet access.
The runner must be able to hit all hostnames mentioned in the GitHub Runner documentation listed above. 443 and 80 appear to be the only required ports.
Several specific hostnames are required to be accessible. Following is a partial list. Any further hostnames which arise due to specific workloads will also need to be opened. tcpdump (Home | TCPDUMP & LIBPCAP) or wireshark (Wireshark · Go Deep) can be used to diagnose hostnames being contacted.
*.github.com
The proxy required for appropriate internet access must be configured correctly on the runner machine and must work for both:
The user performing install.
The local user the service will run as headless.
Install Docker as appropriate for your OS. For Ubuntu, see Install Docker Engine on Ubuntu | Docker Docs.
Register the organisation runner in GitHub
The main step in setting up a runner is to go to GitHub, register a runner, and then run the scripts that this provides you on the runner machine.
This describes how to set up an org-level runner. The steps are very similar for a repo-level runner, the main difference being the first step.
For all commands in this page, you may need to preface with “sudo” then enter your password depending on your permissions.
Go to GitHub > (the org in question) > Settings > Actions > Runners > New runner > New self-hosted runner > Choose your OS and architecture. Copy the resulting text.
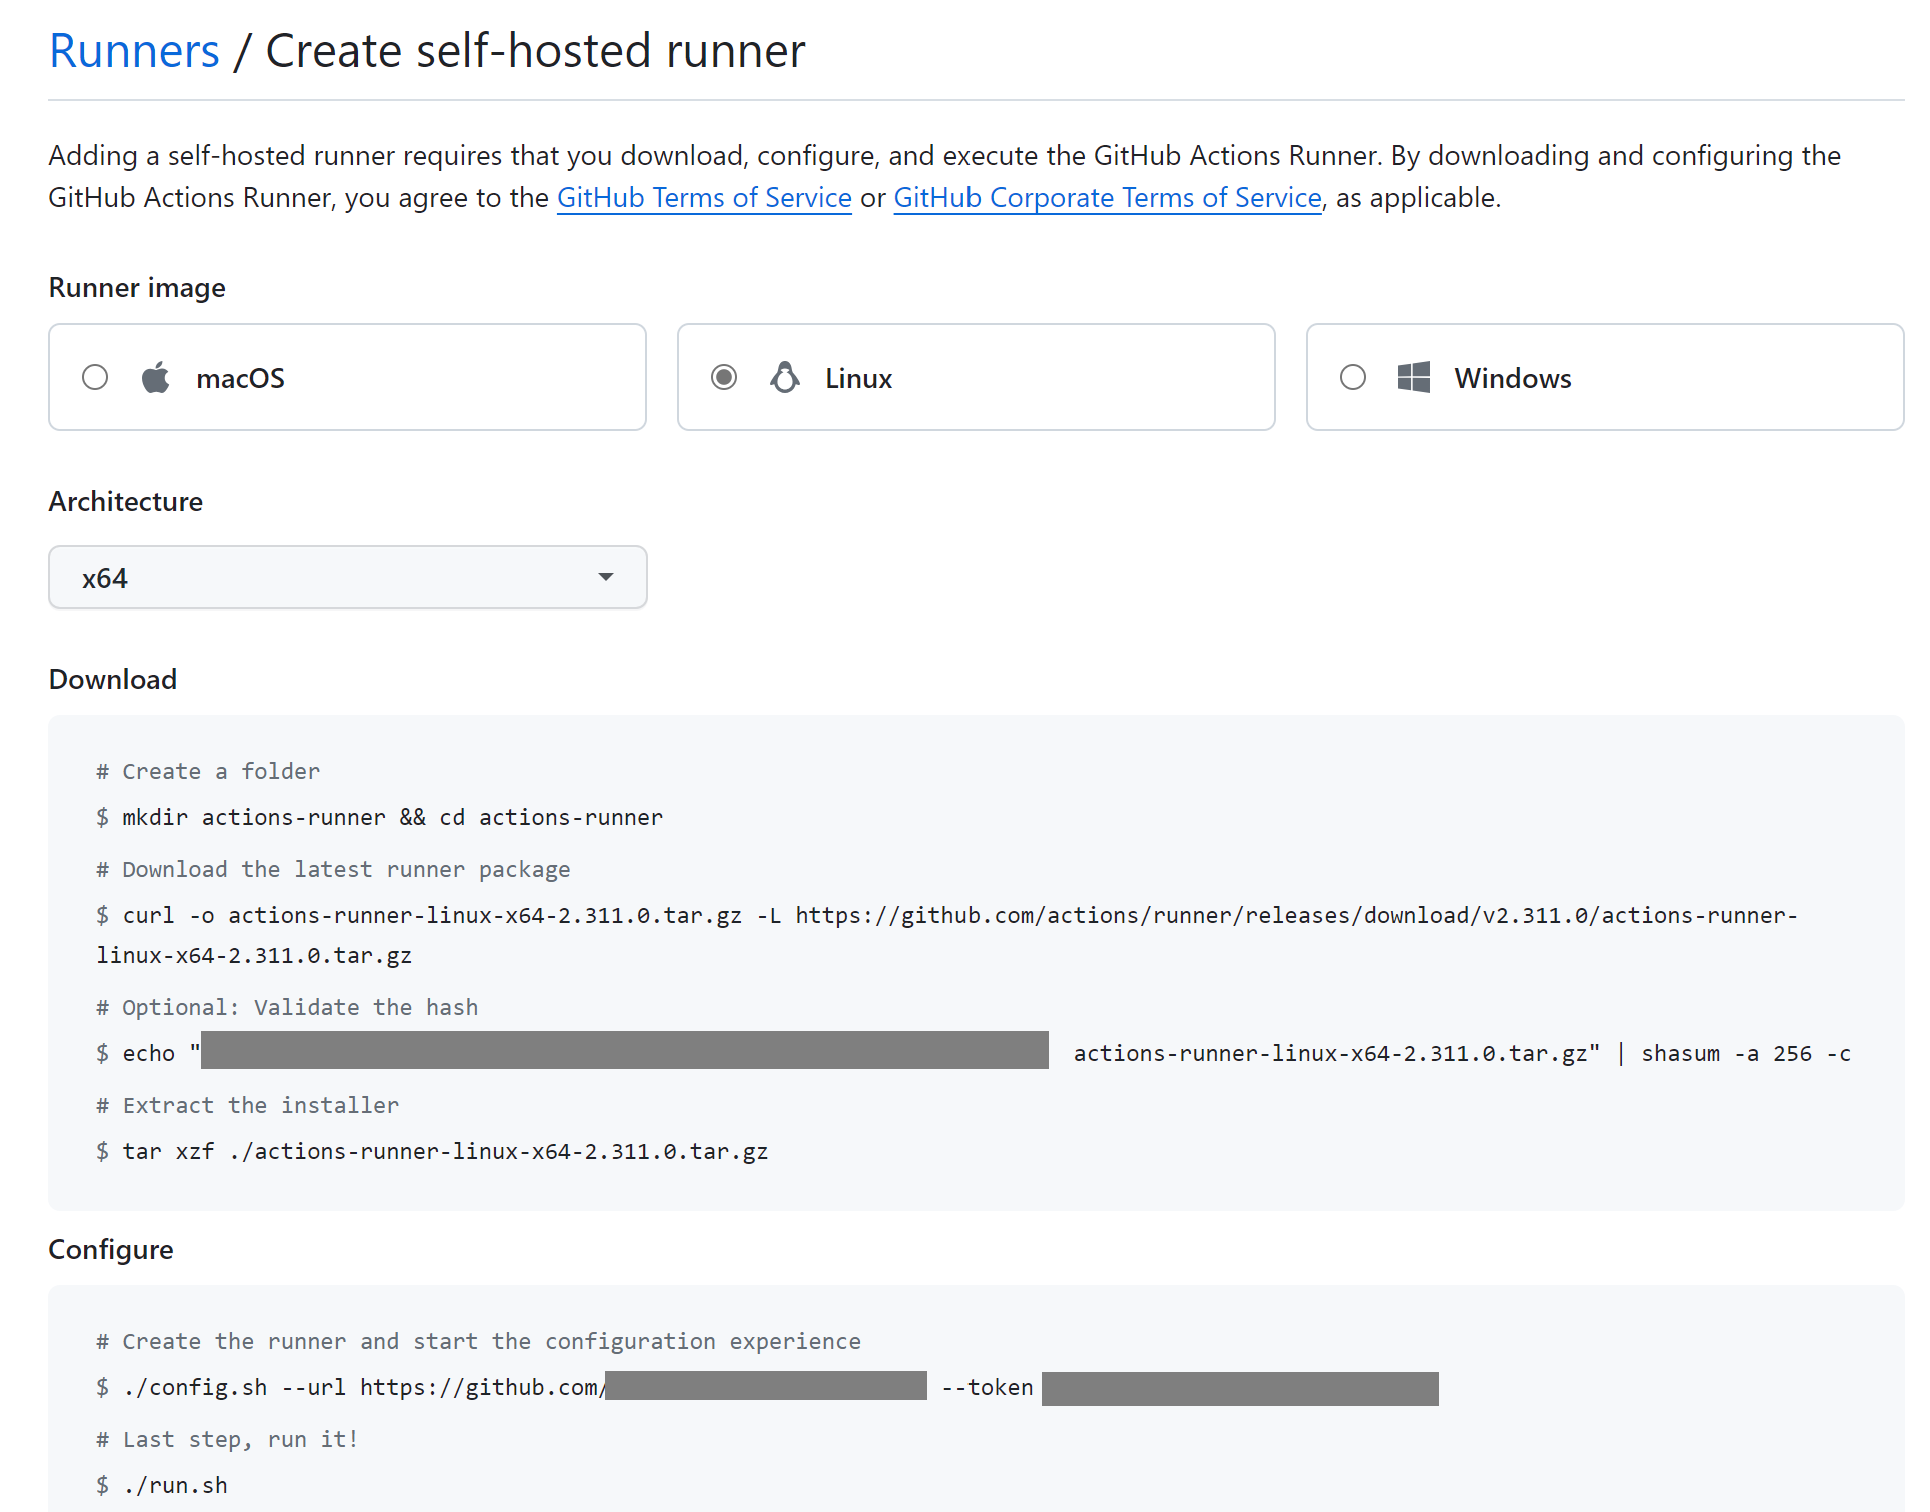
Log into the runner.
Create folder /opt/actions-runner and change directory there:
mkdir /opt/actions-runner
cd /opt/actions-runner
Run the commands from the “Add New Runner” GitHub page, approximately:
$ curl -o actions-runner-linux-x64-2.311.0.tar.gz -L https://github.com/actions/runner/releases/download/v2.311.0/actions-runner-linux-x64-2.311.0.tar.gz

# Optional: Validate the hash
$ echo "29fc8cf2dab4c195bb11234567e2c94cfd4d4022c793b346a6175435265aa278 actions-runner-linux-x64-2.311.0.tar.gz" | shasum -a 256 -c

# Extract the installer
$ tar xzf ./actions-runner-linux-x64-2.311.0.tar.gz

./config.sh --url https://github.com/your-org  --token ABCDEFGHIJKLMNOPQRSTUVWXYZ
Don’t run the last step in the portal that starts the runner (run.sh) - instead we’ll register it as a service later.
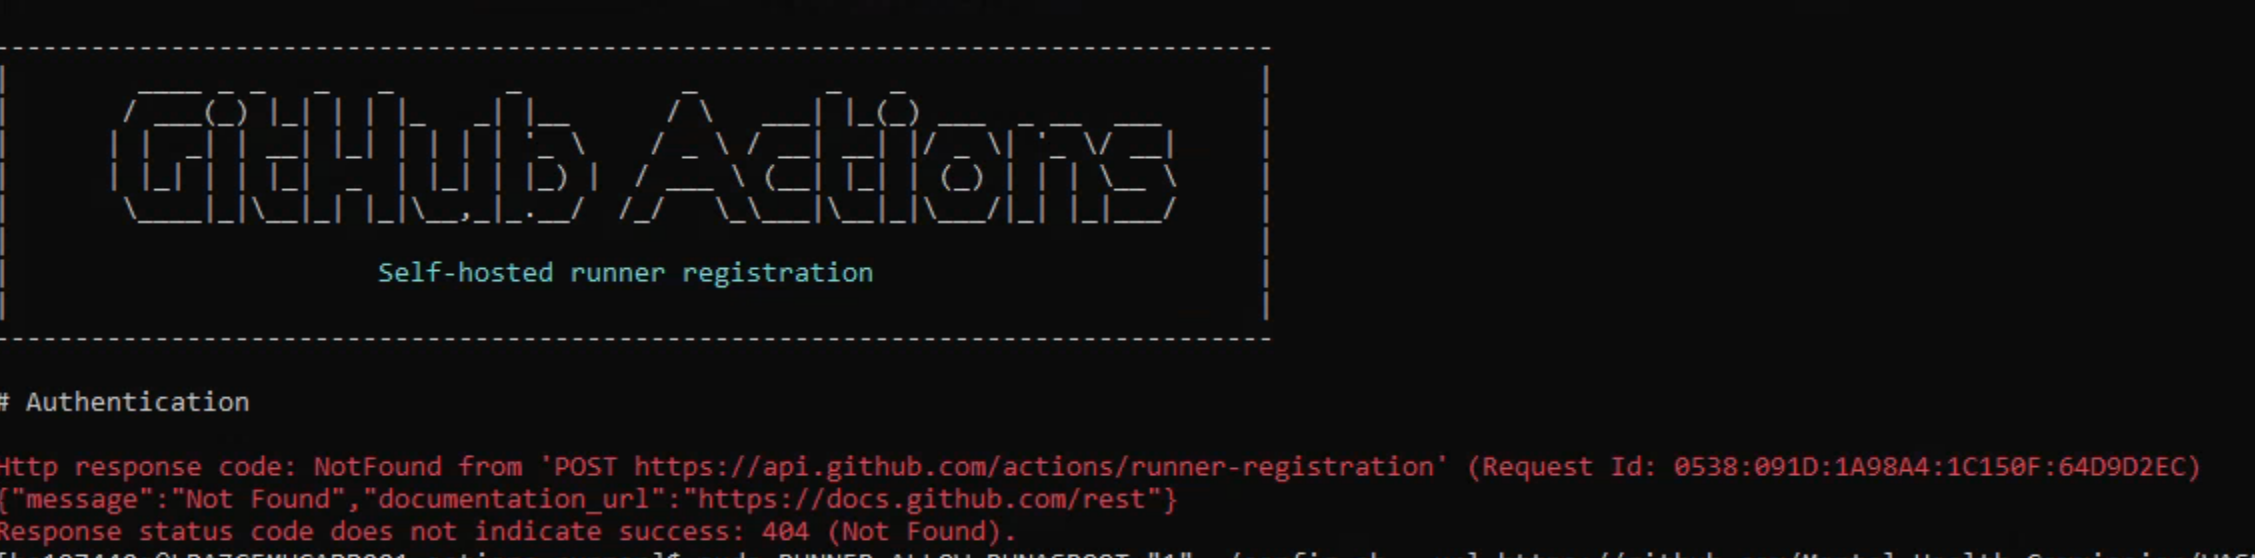
When running config.sh or other runner scripts provided by GitHub, if you don’t have the correct permissions without using sudo you will need to run it as follows due to the script having a failsafe against sudo mode :
sudo RUNNER_ALLOW_RUNASROOT="1" ./config.sh <rest of the command>
If you get a message such as the following when running config.sh it may indicate that you waited too long between getting the command to run and actually running it. The token in the command has a limited timeframe.
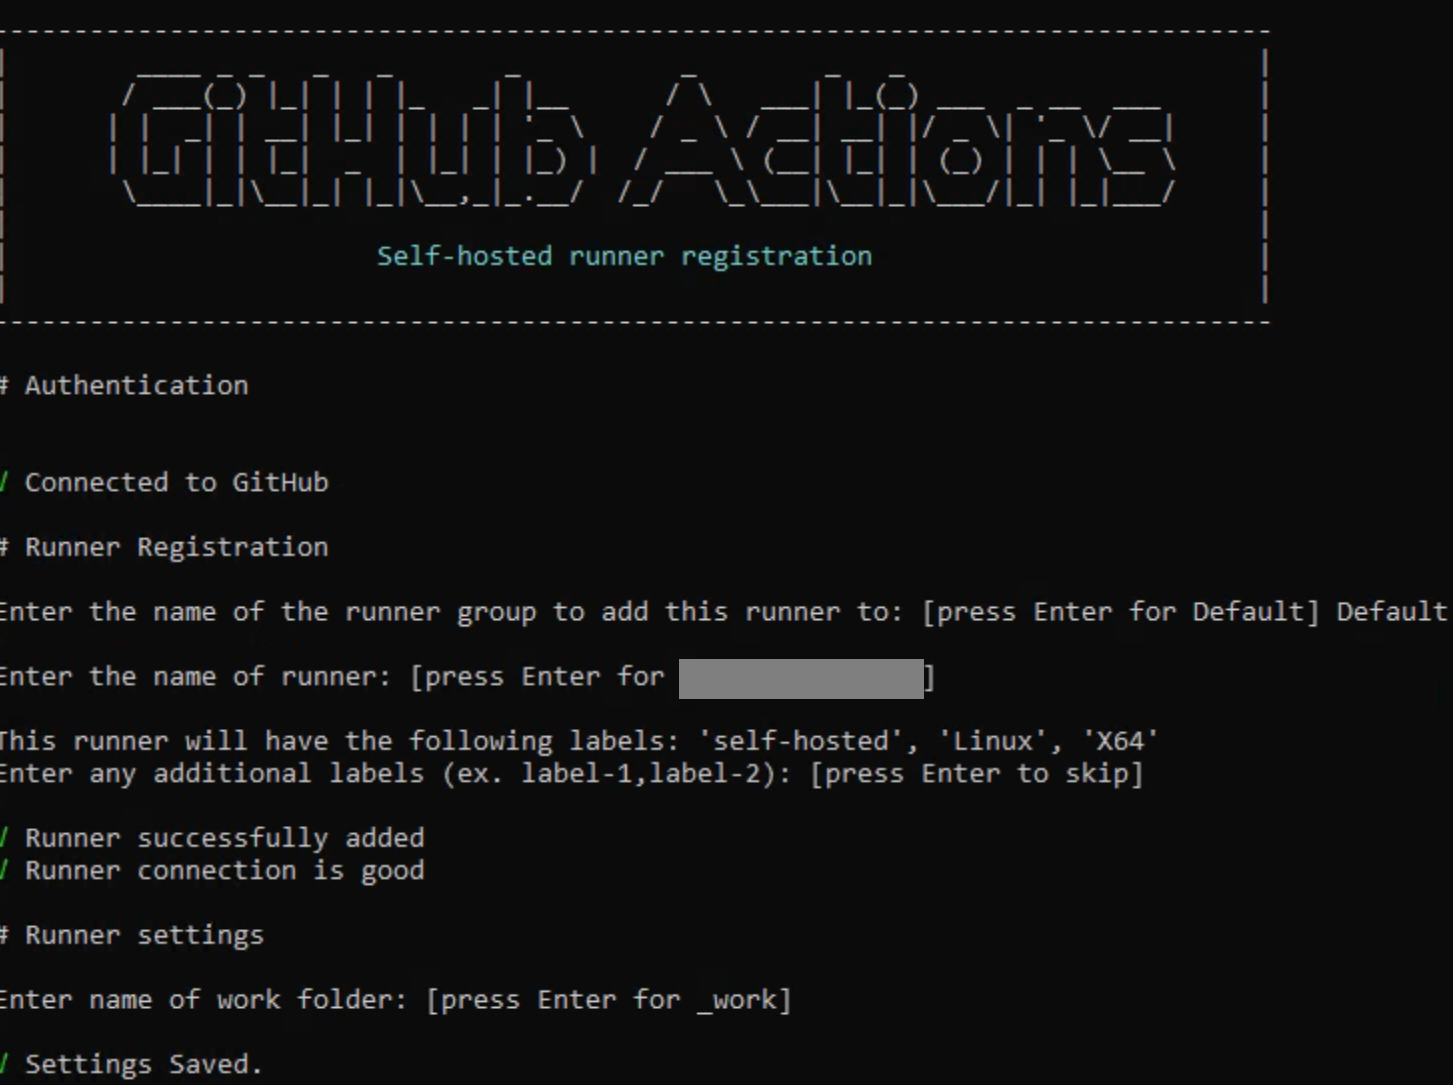
A successful run of config.sh should look like this:
Uninstalling the runner
f at any point you need to uninstall and reinstall the runner to reset the config, the first step is to go to the GitHub portal and remove it from there. That will give you a script to run, the most important part being a short-lived token which is used to deregister it.
If you accidentally force remove the runner from GitHub without removing it from the machine at the same time, this makes it harder to actually remove it from the machine. If this happens, you can force remove it as described here : Removing runner from host *after* force removal in github · actions/runner · Discussion #1437.
Specifically, this involves removing the .runner file then running the remove script.
The following can be then used:
cd /opt/actions-runner
sudo ./svc.sh stop
sudo ./svc.sh uninstall
At this point the old runner instance will be completely removed.
Start the runner as a service
Now the runner is registered, the next step is to start it running. As per Configuring the self-hosted runner application as a service - GitHub Docs, register the runner as a service so it starts when the runner machine starts. This is as opposed to running it interactively as a logged in user.
Create a local service account which the service will run as:
sudo adduser github-runner
When prompted, give it a password, store somewhere secure.
Confirm that it’s not a member of any groups:
groups github-runner
Grant it various permissions in the runner folder:
sudo chown -R github-runner:root /opt/actions-runner/_diag
sudo chown -R github-runner:root /opt/actions-runner/_work
sudo chown github-runner:root /opt/actions-runner/.credentials_rsaparams
Add the service account to the docker group.
sudo usermod -a -G docker github-runner
Install the runner, specifying to run as the local service account.
sudo ./svc.sh install github-runner
sudo ./svc.sh start
Check its status:
sudo ./svc.sh status
Troubleshoot service issues
If the service is having problems it will appear as Offline in GitHub. 
To troubleshoot, application and job logs can be checked (see Monitoring and troubleshooting self-hosted runners - GitHub Docs).
A connectivity test can be run using your own personal access token -
sudo RUNNER_ALLOW_RUNASROOT="1" ./run.sh --check --url https://github.com/your-org --pat ghp_myPat
You can list out running services and look for one that appears to be the runner:
systemctl list-units --type=service
You can tail the relevant service log with the name of the service you gained from the previous step:
journalctl -u actions.runner.your-org.your-machine.service -n 100
You can check which user a service is running as:
systemctl show -pUser,UID actions.runner.your-org.your-machine.service
You can check which services run at startup:
systemctl list-unit-files --type=service --state=enabled
Run a test job
At this point the basics of the runner should be in place, even though no software is installed yet for useful workloads. Create a test pipeline and confirm basic operation. A sample pipeline is as follows. runs-on: self-hosted is what makes it run on the self-hosted runner.
name: Runner Test Pipeline
on:
  workflow_dispatch:

jobs:
  Test:
    name: Test
    runs-on: self-hosted
    steps:
      - name: Script
        run: echo HELLO WORLD

Install other software
Next install software on the runner needed for your particular workload.
As a reference you can consult this page for information on which software is installed on the default GitHub-hosted runner images: runner-images/images at main · actions/runner-images · GitHub.
At this point everything should be working and you can start to test the pipeline with your workload.
Disk space
Disk space will be used up over time especially by docker builds and this must be cleaned up.
df -h will show space across all mount points.
The bulk of job-specific data is stored in /opt/actions-runner/_work. However there isn’t a huge amount stored here - perhaps 3-6GB. Logs can be cleared out from _diag, and other folders may contain clearable content.
ncdu is a very useful way to determine where space is being used and can be better than built in tools like du. Be sure to run it in sudo mode so folders aren’t missed.
sudo apt-get install ncdu
You can then run it on the root folder to get a breakdown of where space is being used.
sudo ncdu /
One common source of a massive amount of disk usage is cached docker fragments. This has been found to take up tens of gigabytes. The following will clear these out.
sudo docker system prune -a -f
Deploying resources in a way that doesn’t expose them to the internet is a good practice where it makes sense to do so as it significantly decreases the attack surface. A GitHub self-hosted runner on the same private network allows you to deploy to these.
Hopefully this article has helped you speed up your GitHub self-hosted runner adoption by jumping some common pitfalls.

Many startups today face a struggle to find a working solution to provide white-labelled solutions for their customers. One common issue is managing...
Over the past two weeks, we had the incredible opportunity to conduct a series of GitHub Copilot workshops in collaboration with our friends at Cyara

3 min read
“GitHub Copilot is not just a developer AI assistant, it's an enabler for the entire development team; and it’s benefits will only increase with the...