 Vicki Turner
Streamline Your Power BI Design: Understanding Theme Impact Across Visuals
Ever spent too much time chasing down the effects of theme changes across multiple visuals in your Power BI reports?
[The “Structure the Data” section of the article has been updated in Feb 2025. As my knowledge and understanding around data modelling has grown, I realised I had mistakenly used a dimensional model instead of a relational model to explain how to structure the data for the app.]
Have you ever had a spreadsheet which tracks something in your work, and you are finding it harder to manage or you want more features than are available in a spreadsheet? The great news is there is a better way!
One option is to convert the spreadsheet to a small app. Normally, this would involve a lot of programming skills and app design, but Microsoft Power Platform provides a way to do this without needing traditional developer skills.
Microsoft Power Platform is a low-code platform. It has excellent functionality and a user-friendly interface, particularly when you are not experienced with development languages. The aspects of Power Platform I’ll be talking about in this article are Dataverse and Power Apps, in particular Model-Driven Apps.
Dataverse is the table-based data repository which has an overlay to make it easier to interact with the database with limited knowledge of how SQL databases work. Within the Dataverse tables, views and forms can be created and these are used in the Model-Driven App to show a whole list of records (view), and also the details within individual records (form). This gives a way to interact with the data without needing to spend much time on the presentation on the screen. If you would like to know more about all the components of Power Platform, head to the Microsoft Documentation.
Knowing there is an option out there, and knowing the steps to get building are often two different hurdles to overcome. When new to low-code development and data structures, there are some foundational concepts that will provide a successful launch-pad. When getting started on a project, the process I learned to use was completing these four initial steps:
Making a plan,
Structuring the data,
Setting up the place to work, and
Building an initial concept app.
In this article I will work through these steps at a high level and point you to external articles that will give you the finer details to boost you on this journey - there are so many fantastic people making content in this space!
Before building, have a think about the spreadsheet you want to convert and draw up a plan. If possible, bring in someone who has some data or app building experience to help you talk through it.
Possible questions to answer are:
what problems are you solving by using the spreadsheet?
are there more problems being solved by using an app?
who has these problems? do different people use the spreadsheet differently?
how is the spreadsheet used now? and
how complex it is likely to get in the future?
Power Platform is best suited to creating products that have a known finite scope, where the functionality required will utilise functionality already available in Power Platform’s existing feature set. If you need to build-in features that require custom JavaScript and additional programming abilities, then you may be able to do an initial proof of concept in Power Platform with the view to getting the app built in an alternative custom way by developers - be that in-house or an external consultancy like Arkahna.
Assessing how the spreadsheet is serving your business now will help give answers to the core functionality required in the app you are going to build. It is worth understanding what needs to be achieved by the app for it to be a good replacement for the existing spreadsheet.
Widening this thinking to include some of the issues that are not currently being solved by the spreadsheet that need to be addressed will provide focus on what functionality available in the Power Platform ecosystem needs to be leveraged. This might include security, auditing history or business process flows.
Think about the audiences for the app. Will you have some users in an administrative role who need to see all the information and then other users that need to see just their own data? This may identify that you require more than one Security Role to show different aspects and data to different people.
How the spreadsheet is currently being used will guide decisions around who your primary users and testers of the app will be, and give you the opportunity to consult with them during this process also.
What can you build as the smallest working version of this app, and what could you add on later? Getting a proof of concept that has reduced complexity is a good place to start, and then breaking into small elements the features and functionality that should be added on afterwards. It’s useful to think about this in concentric circles. You have the base app in the middle, and then bring in more detailed aspects in each version to improve the functionality and perhaps increase the variety of users. This will help to see if any features will be dependent on something else being built into the app first.
This is not an exhaustive list of the kinds of questions you might ask while planning the app, but will get you started on conversations to help formulate the goals the app will achieve, if Power Platform is the right software to use to build it, and how it will be broken into chunks along the development process.
Once you have an idea of what needs to be included in the app, a basic schema diagram needs to be drawn up so you know what tables to build in Dataverse and what relationships there will be between the tables. The process of thinking through the structure of your tables is explained really well by Lisa Crosbie in this video.
In essence, the concept you are trying to achieve is to split the data into a transactional table with a line per ‘event’ in it. Instead of putting all the information for each component of the event, the columns in the transactional table are linked to a record in the reference tables with a 1-many relationship.
For example, in the diagram below, each ‘event’ is a record in movie_showtimes and columns in this table such as auditorium and movie reference a record in the respective table. This provides a link between all the pieces of information required without having to input all the information about the movies and the auditoriums and cinemas for each showing of the movie.

Visual representation of the structure of a normalised relational model in a snowflake schema.
This is the structure you will follow when building the tables and columns in Dataverse, and then putting it into a model-driven app.
Setting Up Your Environment
To use Power Platform you need a license. Model-Driven Apps require Dataverse to run, so in this case you need a Power Apps License. Microsoft provide extensive information on licensing here. There are also components of Power Platform that can be used without a Power Apps License if this is unavailable to you.
When you first navigate to make.powerapps.com, you will be in the default environment for your organisation’s tenant. It is recommended to switch to your own Developer Environment to provide a safe sandbox for you to create without affecting other makers' work. Here are instructions on creating a Developer Environment and switching to it.

Switch away from the default environment using the highlighted option once you have created your Developer Environment.
Once in your Developer Environment, create a Solution. This gives you a container to keep all of the components together that are required for your app to run, so that you are able to package it up for use. The Microsoft documentation provides all the details on how to create a Solution with your own publisher.
Each time you access your Developer Environment to work on your app, the easiest way to ensure everything is located within the Solution is to navigate to the Solution before working. That way any components you create will automatically be inside solution with the publisher name you selected.
Let’s use the plan we have drawn up to create the base level of your app. This will start with the tables in Dataverse and once you have them built out you can then use the forms and views to make the model-driven app.
It’s only when you are actually creating the table that you can change the logical name of the Primary Column. This is the column that will be the hyperlinked field on views, so it’s worth going to the second tab during the creation process and updating the name and logical name while you are there. Dave Yack from 365.training demonstrates this in this short video.
Note: There are a couple of tables that you won’t need to create from scratch. These are common tables such as Account (usually used for the business details) and Contact (usually used for the person involved). These are brought into the solution from the environment as an existing table. This does away with duplicating information that may be used across several different apps in an environment. Lisa talks about how to utilise the list of people who are signing into your app using the User table, or alternatively using the AAD User List virtual table for all the staff in your organisation.
Note: This last table is now called Microsoft Entra ID, but the underlying table name is still aaduser.
The relationship between the Fact table and Dimension tables can be built easiest by adding a column that is a look-up in the Fact table that looks for the Dimension table. This means you need the Dimension tables to be there before creating those lookup columns.
Go through each table and create the columns that you need. A tip is to have a look at the standard columns that are part of every table and check if an existing column can be reused. At this stage, if you have a column which requires a limited number of options, you can create choice or choices as you go along.
The views are how you show what columns are used and what filters are applied to show a list of records in the model-driven app. Keep this to the basic columns rather than everything in the form if possible. It is worth creating a separate view for uploading data if you wish to have an option for a template with those fields in it. Note: there are some columns (such as upload files) aren’t able to be uploaded through the bulk upload function.
The forms where you are showing/changing information about a record are generally created as main forms. Here is a description of the different types of forms that can be created. If you want to show some of the information under a lookup field, then you can create a Quick View form which will be used as a component.
Now that you have all the views and forms created, you can start creating the model-driven app. This starts with the structure of the app and which tables, views and forms will be used. Lisa Crosbie provides a 30 minute tutorial to get started with the building of a Model-Driven App.
There are a few gotchas that you need to make sure are covered for the model-driven app to work how you expect:
Create at least a base Admin level Security Role. For you to assign users to use the app, they need to be added to a Security Role. The first Security Role should have all the permissions you require the administrator of the app to have, so as not to limit its functionality during setup. Once this is done, there can be duplicates made of this Security Role and permissions reduced to enable different audiences to have different functionality within the app.
The Security Role needs to be in the Solution, and also assigned to the app. This is a little tricky to find, but if you navigate to Power Platform admin center and in the Environment you are working in, click on Power Apps and select the share option for the app. This gives you the instructions for all the steps required to have the Security Role connecting Users to the App. This is explained in more detail in the Microsoft documentation.

The Power Apps option to find in the Environment to be able to connect the Security Roles to the Model-Driven App.
Set up the Admin Security Role to be able to bulk upload data. Within the Security Role you design for the Administrator of the app, there is an option that needs to be turned on in the Business Management tab, under Privacy Related Privileges and “Export to Excel” needs to be active. Business Management - Miscellaneous Privileges Part 3 - Megan Walker (meganvwalker.com).
Publish the app. This needs to be done for it to play, and also publish each time you make changes that need to be incorporated.
Once you have an app that you are ready for your team to test, you can export a managed solution as a zip file and import this in a second developer environment. This gives people a way to test the app without the risk of them changing it, and you can get on with continuing to develop your app and release changes in stages.
When exporting an app between environments, it does not contain any underlying data, only the structure of the tables, and all the components included in the solution. This means that you can use different sets of data in the developer environment you are using for creating (or developing) the app, and the environment where testing is taking place. This will be the same for the production environment when you ultimately have your app being deployed for use across your organisation!
Once the model-driven app is built, then another barrier to overcome is getting your existing data into the Dataverse so you can use it in the app. Utilising the ‘Open in Excel Online’ function will provide options for bulk updating of data. Lisa Crosbie does a fantastic job of explaining how to use this feature in this video.

The option to use for doing bulk updates to your data - check your Security Role settings if you can’t see this option in the Model-Driven App.
There are a lot of different aspects to getting your existing spreadsheet into a model-driven app. This article will point you in the direction for many of the steps to cover. If you hit issues, or a still looking for the way to get started, then look around for content creators who you understand the way they explain things. PowerApps 911/Shane Young, Lisa Crosbie, and Pragmatic Works all provide different types of content around Power Platform. You can look for their shorter overview videos of a specific element or longer tutorials on how to go through the process end-to-end. Sometimes creating the same solution they are demonstrating in your developer environment will help cement the skills also.
Useful References:
Lisa Crosbie explaining in more detail when you might choose to use Model-Driven Apps.
Lisa Crosbie also has a 3 hour course on using Model-Driven Apps if you are looking for a comprehensive tutorial.
Shane Young does a 10-part series comparing building a Model-Driven App vs a Canvas App, starting with this video.

Ever spent too much time chasing down the effects of theme changes across multiple visuals in your Power BI reports?

As a Data Analyst, when given the initial brief for a report that has been requested, the first instinct can be to open Power BI, hook up to the data...
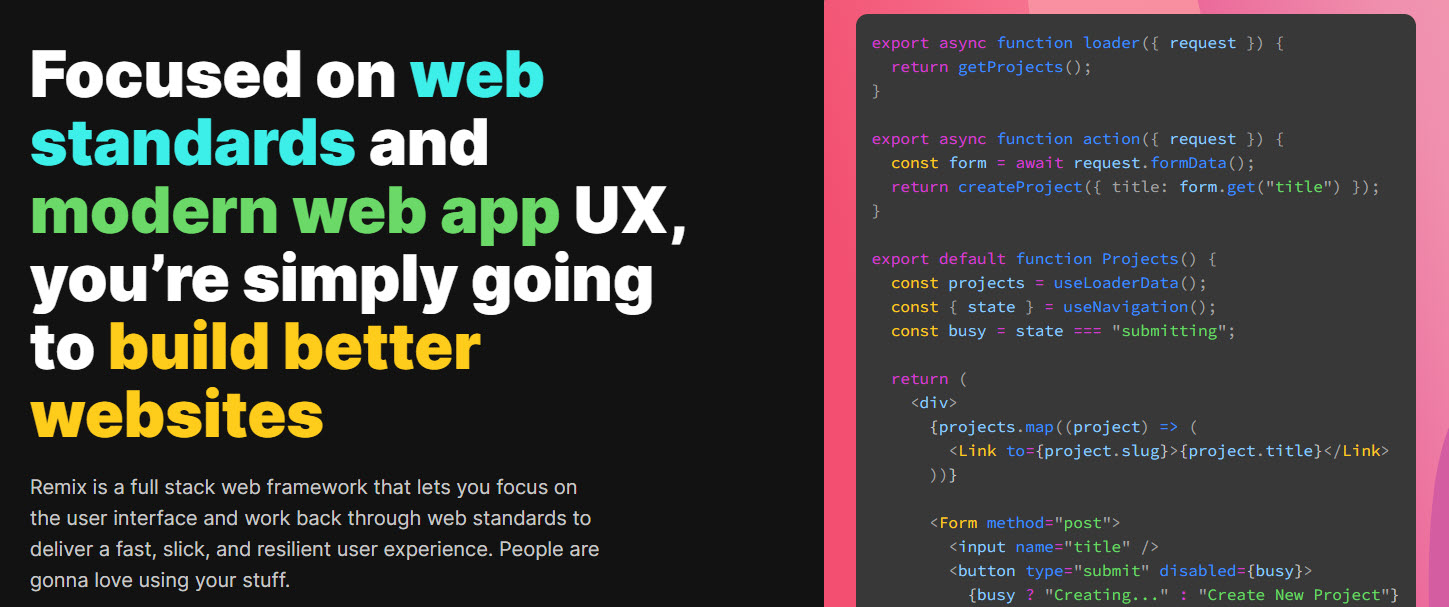
What is Remix? What is Remix? It is one of the full stack frameworks recommended by the React team for building entire web apps. A number of concepts...