 Samuel Parsons
Streamlining Environment Provisioning for Startups with GitHub Actions Matrix Jobs
Many startups today face a struggle to find a working solution to provide white-labelled solutions for their customers. One common issue is managing...
Welcome to the mini-blog series on data science in Visual Studio (VS) Code!
In this first article, we will complete the following steps:
Install VS Code
Explore and install VS Code Extensions
Install a Supported Version of Python on your system
Create a Virtual Environment to begin exploring
To complete these steps - you will need access to a device with local administrator (you will need the permissions to install applications to your computer). Please note this series is written foremost for Microsoft PC users, although I will provide some Mac guidance here or there from lessons learned. Like most Microsoft products, there are many ways to complete the same activity - I’ll just show you one. Let’s get to it!
Head over to Download Visual Studio Code - Mac, Linux, Windows and pick the version that is right for your system:

While this may differ for you, I have selected the Windows 11 x64 system installer version (second from top on the left). Download the installer and complete the installation process.
Once installed, you will be met by the Welcome Screen on start up.

Don’t worry if yours looks a little different - I had to blur some of the extensions installed on the left pane, recent files and suggested next steps in extensions - didn’t want to spoil the surprise.
Where to from here? Well, lets see if we can find anything about Python.
Click on 1. Extensions icon (left hand menu)
Search for ‘python’ in the Extensions Marketplace
Select Python ‘Python language support…’ 129.5M extension by Microsoft
Read about the Extension in the main window, before Installing it by pressing 4. Install
A few things to note here - the publisher is listed below the extension name in the Marketplace. The Python extension we are searching for an installing is created by Microsoft. As you can see down the list, there are a number of Python-related extensions that are available from third party providers.
Extensions have ratings and counts of downloads - this extension has 129,519,307 downloads (at time of screenshot) with 595 ratings of 4 stars.

Another useful extension for working with data in VS Code is the Data Wrangler extension by Microsoft. Search for ‘Data Wrangler’ in the Marketplace extensions, and install the Microsoft release.

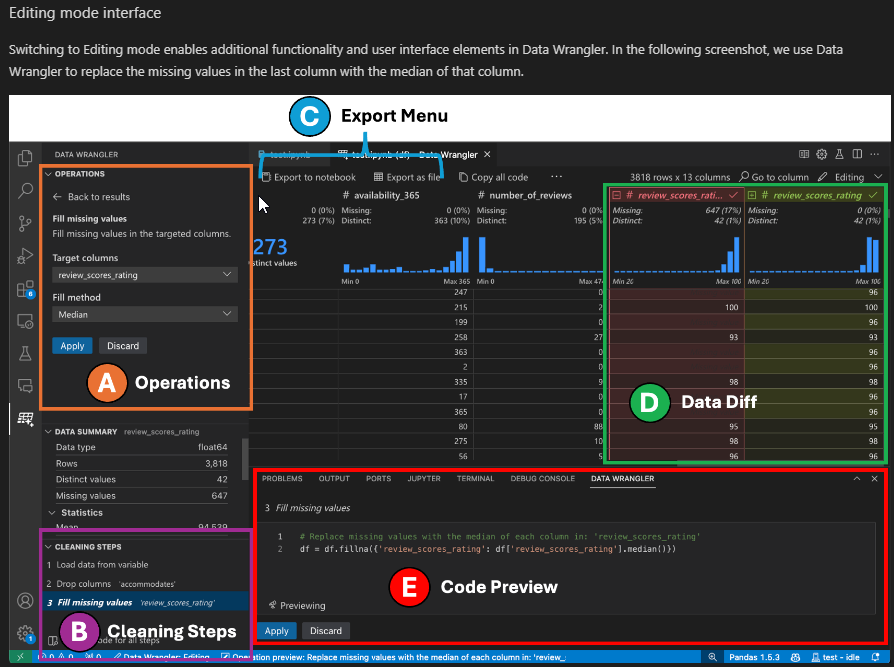
I don’t want to get too ahead here - but scroll down on the Data Wrangler description page and check out the features and functionality. The Editing mode interface alone is amazing.., data previews, real-time data editing including generating the python code? Yes please!

The last extension we will install (for now) is Jupyter.
Search for ‘Jupyter’ in the Marketplace extensions, and install the Microsoft release.

Jupyter notebooks allow for a notebook environment where you can write code, run functions and review the outputs in one pane. You can also add commentary via markdown cells as you go - this is where most of our python coding will take place.
Now we have notebooks and the python extension we are good to go, right? Not yet!
We still need a supported python interpreter on your system. You can find your way via Google or Bing Search, otherwise head back to the Python extension and scroll down on the details until you see the 1. Quick start guide section below:

Click on 2. Step 1. Install a supported version of Python on your system. This will take you to the Get Started Tutorial for Python in Visual Studio Code page, which will then instruct you to visit the Download Python | Python.org page. For most users, the latest stable release (1) is appropriate - but check your system requirements:

Install Python by downloading and running the installer. There will be a checkbox to ‘add to Path’ check this.
There is some conjecture about ‘the best place to install python’. Rather than join the masses (or put my neck on the line!) I asked Bing (so I wouldn’t have to):

Personally I went with option 2 - as it’s accessible to all users, and doesn’t have issues with file path length if it’s hidden away in an odd path somewhere. You do you! (or if in doubt, #2).
At this point I must advise that AI-generated content may be incorrect…
Ready to kick down the door to the dungeon?
We need a project folder to begin work - lets not complicate this with repositories and source control just yet.

In VS Code complete the following steps:
Select the ‘Data Explorer’ tab
Select 'Open Folder'
Navigate to and create a Folder structure to house your projects
In my example I have created C:\Python Coding\Data Science Exploration
Select the base folder ‘Data Science Exploration’
Select ‘Select Folder’
You should be prompted with the following:

Select ‘Yes, I trust the authors’. You can also select the parent folder 'Python Coding' checkbox to avoid this dialogue again for your future projects in this folder.
We now have an open folder in our Explorer pane: ‘DATA SCIENCE EXPLORATION’ (or the name you selected for your folder above):
Hold Ctrl+Shift+P to bring up the Command Palette and type 1. ‘Python’ then select 2. Create Environment…

Select Venv ‘Creates a '.venv’ virtual environment in the current workspace.

Select the Python interpreter you installed earlier - if you followed Step 3 it should prompt as it is on path. If not, you can enter the interpreter path… and navigate to where you installed python earlier.

When you select the Python interpreter, the system will automatically Create the environment.

Confirm the environment is created by:
Reviewing the pop-up 1. The following environment is selected… and
Sighting and clicking the green .venv folder within the DATA SCIENCE EXPLORATION folder.
To start the environment load the command palette by holding Ctrl-Shift-P and typing ‘Terminal’ - start a Python terminal. Check the file path matches the virtual environment / project path and type: .venv\scripts\activate

The green (.venv) return on the following line tells us the virtual environment is now active.
Congratulations! That’s the end of the first activity.
If this is your first time working with VS Code and you completed the steps fault free - well done!
If you ran into issues, try revisiting the previous steps. You can always uninstall and then reinstall various components until you get it to work.
In this tutorial we have:
Installed VS Code
Installed VS Code extensions: Python, Data Wrangler, Jupyter
Installed Python decoder
Created a Virtual Environment
Loaded the Virtual Environment
We will explore why you should use a Virtual Environment rather than the System for installations, explore the Python libraries and packages and take the next steps!
Continue to Part 2: Initial Libraries and Data Import

Many startups today face a struggle to find a working solution to provide white-labelled solutions for their customers. One common issue is managing...

If this is the first post you have opened, I recommend you jump back to the Part 1. Install VS Code, relevant extensions and create a virtual...
Howdy! In my previous article about Getting Started with Terraform I talked about what Terraform is, why it's neat-o, and a small example on getting...